Backing up contents of Teams
This user guide helps you how to back up certain data of the Teams app.
Teams and channels
Teams and channels cannot be exported. Certain content from Teams and channels can be backed up as described below.
Chats
Chat content cannot be exported automatically from Teams. The following options are available for saving chat content:
- Making screenshots
- Copy and paste function (text only)
- Select an area by clicking on it with the mouse, holding down the left mouse button and dragging it over the area. The area now appears with a coloured background.
- Press Ctrl + C to copy the marked content.
- Paste the content in the desired place, for example in a Word document, using Ctrl + V.
- Function Share to Outlook (only possible for individual messages)
- Click on a message or move the mouse over it.
- Click on the three-dot menu in the emoji window that appears.
- Select Share to Outlook.
Note
The Share to Outlook function is only available to Exchange users with a calendar function. You can find detailed user guides on how to Share to Outlook from Teams on the Microsoft website.
Conversations
Conversations are contents from Teams and channels and cannot be exported automatically from Teams. To save conversations, the following options are available:
- Making screenshots
- Copy and paste function (text only)
- Select an area by clicking on it with the mouse, holding down the left mouse button and dragging it over the area. The area now appears with a coloured background.
- Press Ctrl + C to copy the marked content.
- Paste the content in the desired place, for example in a Word document, using Ctrl + V.
- Function Share to Outlook (only possible for individual messages)
- Click on a message or move the mouse over it.
- Click on the three-dot menu in the emoji window that appears.
- Select Share to Outlook.
Note
The Share to Outlook function is only available to Exchange users with a calendar function. You can find detailed user guides on how to Share to Outlook from Teams on the Microsoft website.
Files and folders
- Log in with your credentials at the Microsoft 365 portal.
- In the left navigation bar, click Apps and select OneDrive in the Apps section.
- The OneDrive web app opens.
- Via the left navigation bar – My files either individual files or complete folders can be saved with the Download function by activating the checkbox next to the desired entries. When downloading complete folders, the files are transmitted in ZIP format.
- More content from your channels is available via the left navigation bar at Quick Access (Schnellzugriff). Proceed in the same way as described above.
You can find detailed user guides on Downloading files and folders from OneDrive or SharePoint on the Microsoft website.
Note
Note the following maximum limits for downloading files from OneDrive:
- File size: 250 GB
- Number of files per folder: 10.000
- Files in a ZIP file: 20 GB
Contacts
There is no possibility to export contact lists from Teams.
Calls
There is no possibility to export the call history.
Calendar
Appointments from the Teams calendar can be downloaded as an ICS file.
- Open Outlook via the web app at https://outlook.office.com/calendar.
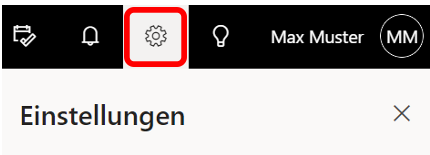
- Click on the gear symbol at the top right. The settings window opens.
- In the settings at the bottom, click on View all Outlook settings.

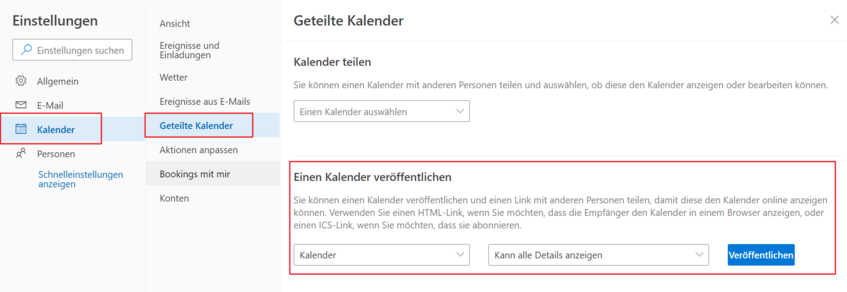
- Click on the Shared calendars entry.
- In the section Publish a calendar select the calendar you would like to export.
- In the dropdown menu Select permissions select the option Can view all details. Click Publish.
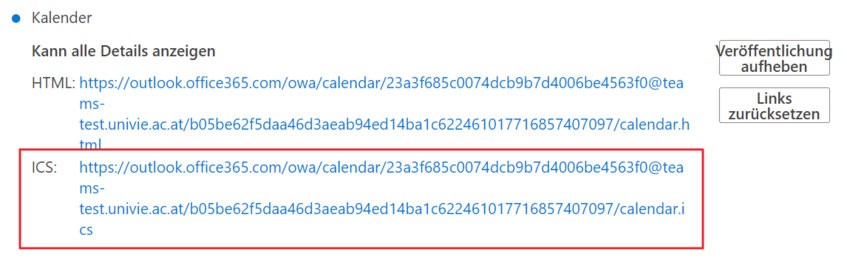
- Two download links are being generated. Click on the link next to ICS and then on Download.
Note
No invited persons are visible in exported appointments. The link to join a Teams meeting is only valid as long as the Teams environment (for example Teams test environment) is still active.
Whiteboard
To export your Whiteboard from Teams as an image, proceed as follows:
- Select Settings in the top right-hand corner.
- Select Export image.
- Choose between standard or high image resolution. Click on Export.
- You can find the exported image in the Downloads folder.
OneNote
The following options are available for backing up your OneNote notebooks:
- via the OneNote desktop app (recommended)
- via the OneDrive web app
Exporting a OneNote notebook via the OneNote desktop app
Note
The OneNote desktop app must be installed on your device.
- Open the OneNote file you want to export in the OneNote desktop app.
- Alternatively you can
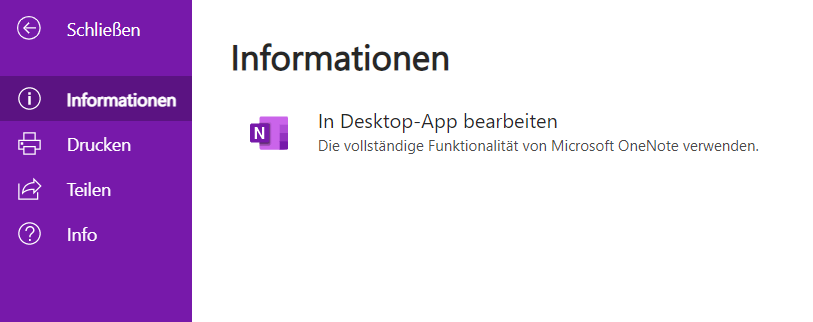
- switch from the OneNote web app to the OneNote desktop app by clicking the File tab when the file is open and then clicking Edit in desktop app under the Information menu item.
- switch from the Teams desktop app to the OneNote desktop app by clicking OneNote in the toolbar on the left, then clicking the File tab at the top, and then clicking Edit in desktop app under the Information menu item.
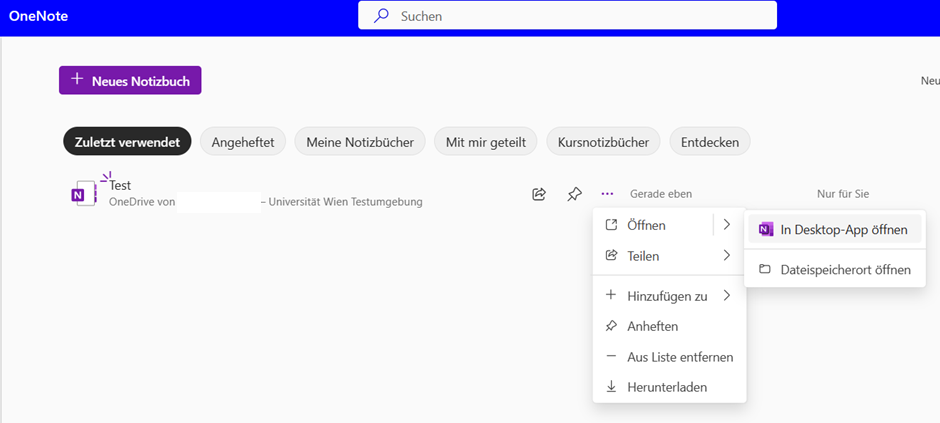
- directly after opening the OneNote web app by clicking on the three-dot menu next to the desired notebook and then opening the notebook in the desktop app via Open – Open in desktop app.
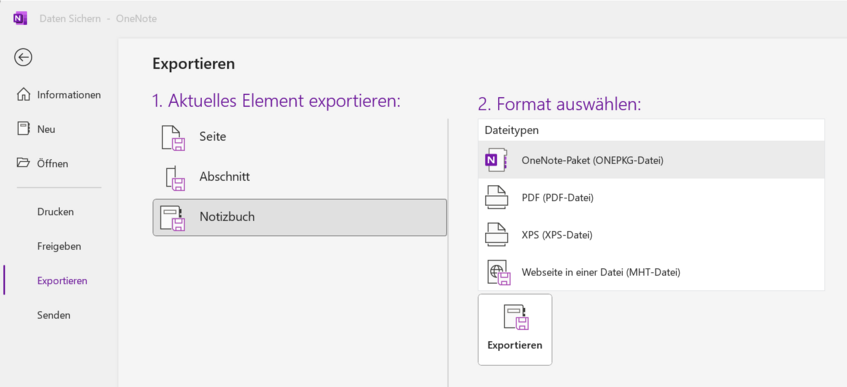
- In the OneNote desktop app, click the File tab and click Export on the entry.
Note
There is no File tab in the OneNote desktop version for Windows 10. Instead, use OneNote 2016 from your Microsoft Office 2019 version or OneNote for Windows 11. You can download the latest OneNote version from the OneNote web pages.
- Under 1. Export current select Notebook.
- Under 2. Select format select the desired file type.
- Click Export and save it to your desired location.
Exporting a OneNote notebook via the OneDrive web app
See the user guides for Files and folders.
Note
When downloading OneNote notebooks via OneDrive, a faulty ZIP file may occur for reasons still unknown on the part of Microsoft. In this case, use the option recommended above to export OneNote files via the OneNote desktop app.
Planner
You can export your Planner plan to an Excel file. You can find out how to do so in the Microsoft user guides Export a plan to Excel.
Stream
You may only download a video if you have uploaded the file yourself or if you are the owner of the file.
- Open the Stream web app at https://web.microsoftstream.com/.
- In My content – Videos select the file you want to download.
- Click on the three-dot menu and select Download video.
Lists
You can export content from the Lists app to an Excel or CSV file. You can find out how to do so in the Microsoft user guides Export to Excel from SharePoint or Lists.