Linux
This user guide helps you to access the online storage space, share or web space via Linux.
Requirements
- A valid u:account userID and password
- Ubuntu 14.04 or later
Connect with SSH
Graphical interface
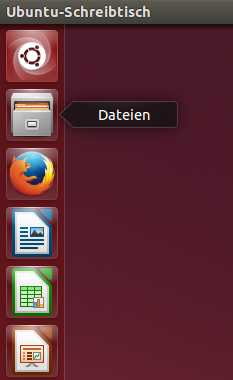
In the left program bar open the file manager with a double click.
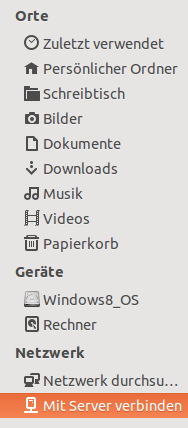
In the left menu, select Network – Connect with Server.
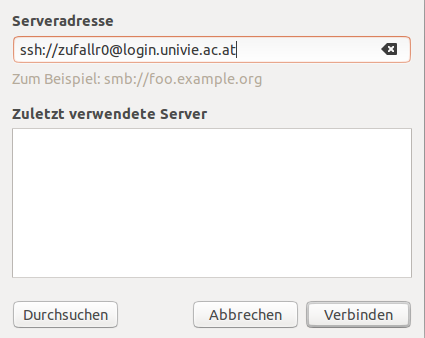
In the next window, type in the following server address:
- Online storage space:
ssh://u:account-UserID@login.univie.ac.at/home/u:account-UserID/fileserver/
(Example:ssh://zufallr0@login.univie.ac.at/home/zufallr0/fileserver/) - Share:
ssh://u:account-UserID@shareX.univie.ac.at/sharename
(Example:ssh://zufallr0@share9.univie.ac.at/fantasyname)
TheXin the name of the device must be replaced by the number of the corresponding share server. You can find the number in My u:account. - Web space:
ssh://u\u:account-UserID@webspace-access.univie.ac.at/u/u:account-UserID/
(Example: ssh://u\zufallr0@webspace-access.univie.ac.at/u/zufallr0/)
Click Connect.
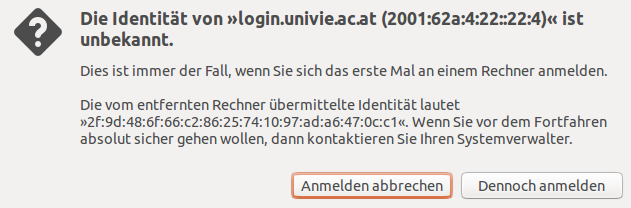
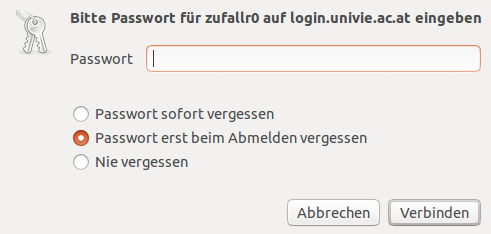
Confirm your identity by clicking Still register.
Type in your password. You can permanently save your password by selecting Remember.
The online storage space or share are available in the file manager.
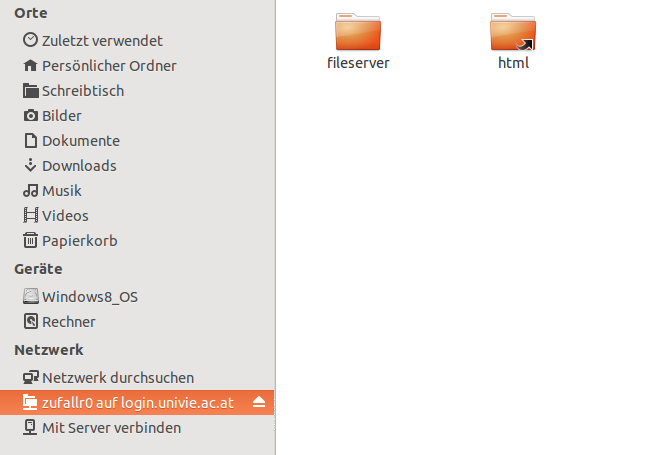
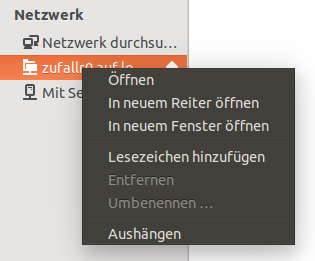
If you want to permanently save your login details, you can add a bookmark via right-click. The entry will then remain in the menu bar Network even after a reboot.
Terminal
A requirement for the usage is the installation of the package sshfs. You can install it after opening the terminal with the following command:
sudo apt-get install sshfs
Online storage space: Use the following commands for incorporating the folder:
sudo mkdir /media/perssudo chmod 777 /media/perssudo sshfs u:account-UserID@login.univie.ac.at:./ /media/pers -o allow_other
(Example:sudo sshfs zufallr0@login.univie.ac.at:./ /media/pers -o allow_other)
Share: Change the lines as follows:
sudo mkdir /media/sharesudo chmod 777 /media/sharesudo sshfs u:account-UserID@shareX.univie.ac.at:/sharename/ /media/share -o allow_other-o umask=0002
(Example:sudo sshfs zufallr0@share9.univie.ac.at:/pugilistik/ /media/share -o allow_other-o umask=0002)
Web space: Change the lines as follows:
sudo mkdir /media/webspacesudo chmod 777 /media/webspacesudo sshfs u\\u:account-UserID@webspace-access.univie.ac.at:./ /media/webspace -o allow_other,follow_symlinks
(Example:sudo sshfs u\\zufallr0@webspace-access.univie.ac.at:./ /media/webspace -o allow_other,follow_symlinks)
Connect via Samba
Graphical interface
Connecting via Samba basically works the same way as via SSH. Additionally, the device must be in in the data network of the University of Vienna or connected via Wi-Fi or VPN.
The difference between the integration of the folders is as follows:
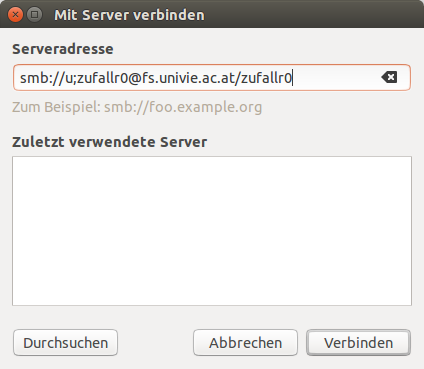
- Online storage space: Type in the following server address in the window Connect with Server:
smb://u;u:account-UserID@fs.univie.ac.at/u:account-UserID
(Example:smb://u;zufallr0@fs.univie.ac.at/zufallr0) - Share: Type in the following server address in the window Connect with Server:
smb://share;u:account-UserID@share.univie.ac.at/sharename
(Example:smb://share;zufallr0@share.univie.ac.at/fantasyname) - Web space: Type in the following server address in the window Connect with Server:
smb://u;u:account-UserID@webspace-access.univie.ac.at/u:account-UserID
(Example:smb://u;zufallr0@webspace-access.univie.ac.at/zufallr0)
Click Connect.
Terminal
Online storage space: Use the following commands to integrate the folder:
sudo mkdir /media/perssudo chmod 777 /media/perssudo mount -t cifs -o username=u:account-UserID,domain=u //fs.univie.ac.at/u:account-UserID /media/pers -o uid=$(id -u) -o gid=$(id -g)
(Example:sudo mount -t cifs -o username=zufallr0,domain=u //fs.univie.ac.at/zufallr0 /media/pers-o uid=$(id -u) -o gid=$(id -g))
Share: Change the line as follows:
sudo mkdir /media/sharesudo chmod 777 /media/sharesudo mount -t cifs -o username=u:account-UserID,domain=share,vers=1.0 //share.univie.ac.at/sharename /media/share-o uid=$(id -u) -o gid=$(id -g)
(Example:sudo mount -t cifs -o username=zufallr0,domain=share,vers=1.0 //share.univie.ac.at/pugilistik /media/share-o uid=$(id -u) -o gid=$(id -g))
Webspace: Change the lines as follows:
sudo mkdir /media/webspacesudo chmod 777 /media/webspacesudo mount -t cifs -o username=u:account-UserID,domain=u //webspace-access.univie.ac.at/u:account-UserID /media/webspace -o uid=$(id -u) -o gid=$(id -g)
(Beispiel:sudo mount -t cifs -o username=zufallr0,domain=u //webspace-access.univie.ac.at/zufallr0 /media/webspace-o uid=$(id -u) -o gid=$(id -g))