Features in a meeting
This user guide helps you to use the controls available during a video conference via Zoom.
You can access these functions via the menu bar at the bottom of the Zoom meeting window.
Meeting controls
The meeting controls are displayed on screen for the host if they move their cursor in the Zoom meeting window and the screen is not shared.
Depending on the selected encryption and settings, the following elements are available in the meeting controls by clicking them:
End-to-end encryption (default)

Enhanced encryption

- Mute: Controlling the microphone; to access the Audio Controls click the ^ arrow icon next to Mute / Unmute. (This allows you to test and change the microphone and speaker that Zoom is currently using on your computer, leave computer audio and access the full audio settings).
- Start/Stop Video: Controlling your camera; to access the Video Controls click the ^ arrow icon next to Start Video / Stop Video. This allows you to change cameras if you have multiple cameras, select a virtual background, or access your full video settings.
- Security: Managing security options
- Participants: Inviting participants
- Polls: Creating and launching polls during the meeting
- Chat: Accessing the chat window to chat with the participants or to manage the chat.
- Share Screen
- Record: Recording a meeting
- Breakout rooms: Managing breakout rooms
- Reactions: Using reactions
- End: Ending a meeting
Video tutorial on how to configure your Zoom meeting audio and video
Managing security options
The Security icon in the meeting controls allows the host or co-host of a meeting to enable or disable options during a meeting to secure the meeting and minimise disruptions during the meeting. Enabled options are ticked.
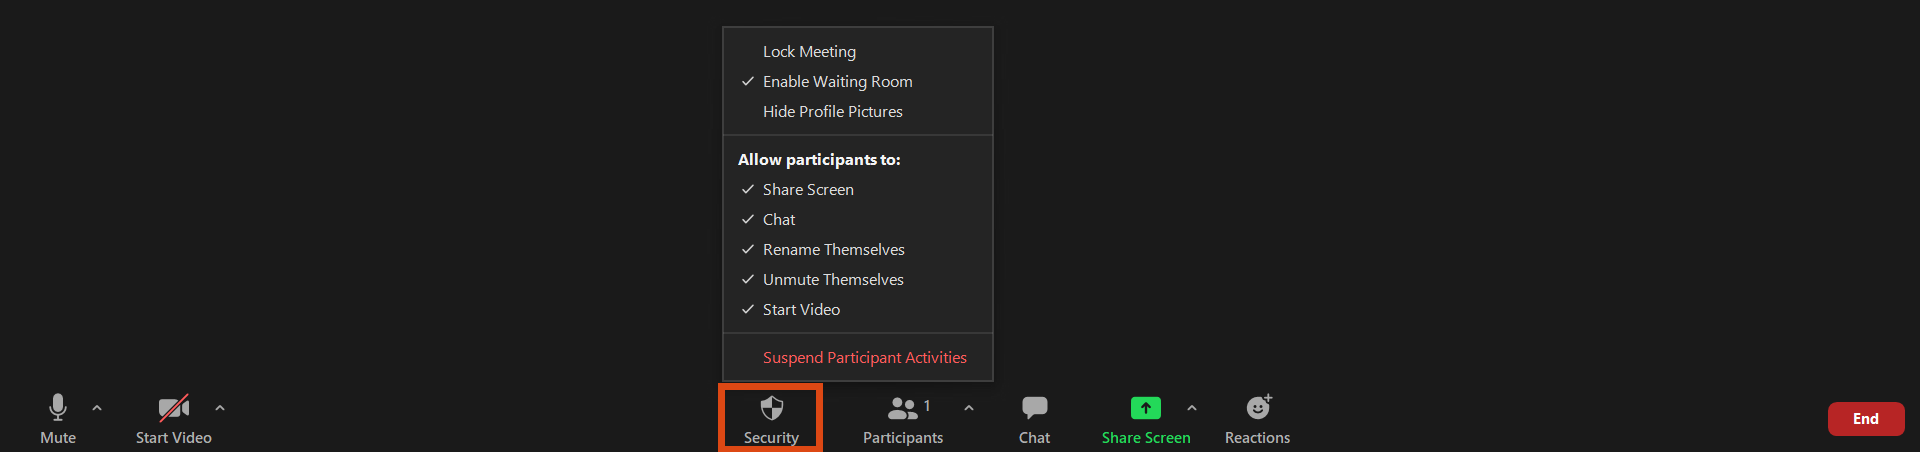
- Lock Meeting: New participants can no longer join the meeting.
- Enable Waiting Room: Enables a Waiting Room for incoming new participants or moves current participants into the Waiting Room.
- Hide Profile Pictures
- Share Screen: Allows participants to share their screens.
- Chat: Allows participants to use the chat function.
- Rename Themselves: Allows participants to rename themselves during the meeting.
- Unmute Themselves: Allows participants to unmute themselves without the host's permission.
- Start Video: Allows participants to start their video in the meeting.
- Suspend Participant Activities: Turn off all participants’ video, audio, in-meeting chats and annotations. The ability to share their screen, recordings and breakout rooms are stopped. This interrupts your meeting temporarily to remove, e.g. a participant disturbing the meeting.
Depending on your initial settings, additional options may be available:
- Annotate on Shared Content: Allows participants to annotate over content shared during the meeting. The host can enable or disable annotation when the host is sharing.
- Remove Participant: Allows the removal of a participant from a meeting. The participant cannot re-join unless Allow removed participants to rejoin is enabled in the Meeting settings.
Inviting participants
If you would like to invite others during a meeting, take the following steps:
In the meeting controls at the bottom of the Zoom meeting window click the ^ arrow icon next to Participants.
Click Invite.

Click Default Email to send the invitation with your default e-mail application on your device.
A new e-mail is prepared automatically that contains the meeting information. Add recipients to the e-mail and send it.
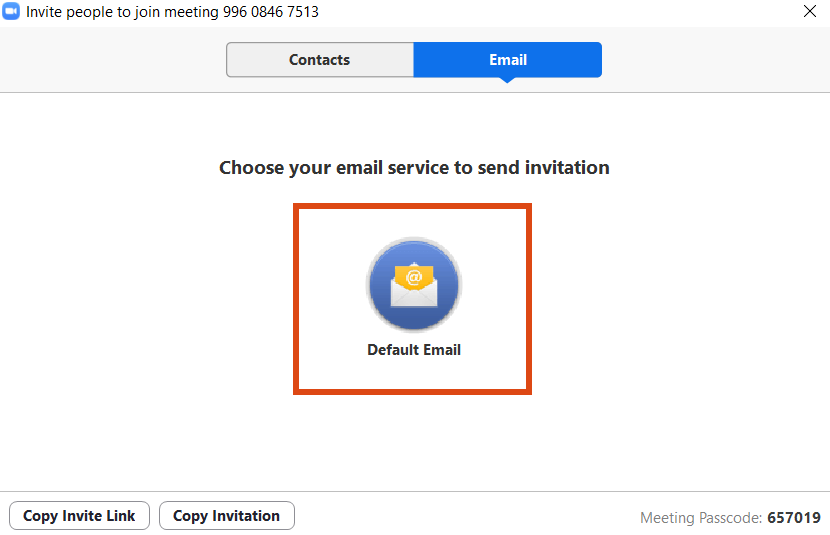
Alternatively, you can also copy the invitation link or the entire invitation by clicking the relevant buttons at the bottom left to your clipboard to re-use it.

Adding a co-host
To add a co-host during a meeting, take the following steps:
- Hover over a user's video.
- Click the ellipsis icon (...).
- Click Make Co-Host.
Alternatively:
- Click Participants in the meeting controls at the bottom of the Zoom window.
- Hover over the name of the participant who you want to make co-host, and choose More.
- Click Make Co-Host.
Once a participant has been made a co-host, they will have access to the co-host controls.
Managing the chat
Controlling and disabling the chat
Click Chat in the meeting controls at the bottom of the Zoom window.

At the bottom right of the chat window, click the ellipsis icon (...) and specify with who the participant is allowed to chat.
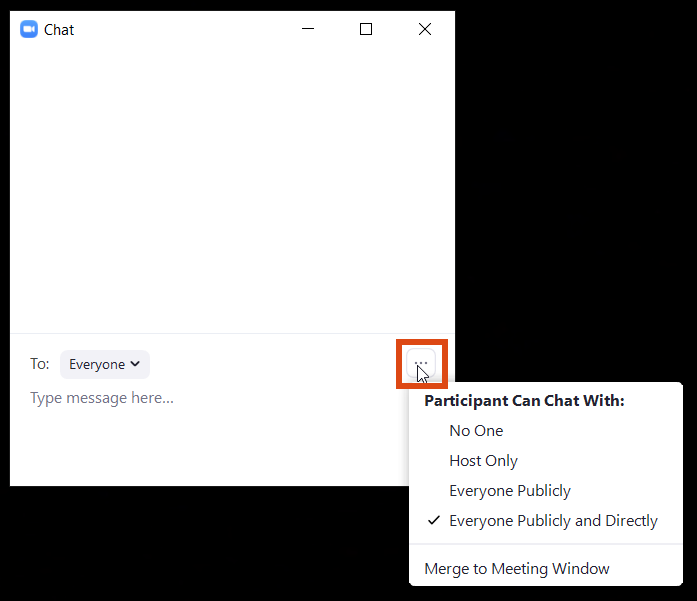
Further information about controlling in-meeting chat access can be found in the Zoom Help Center.
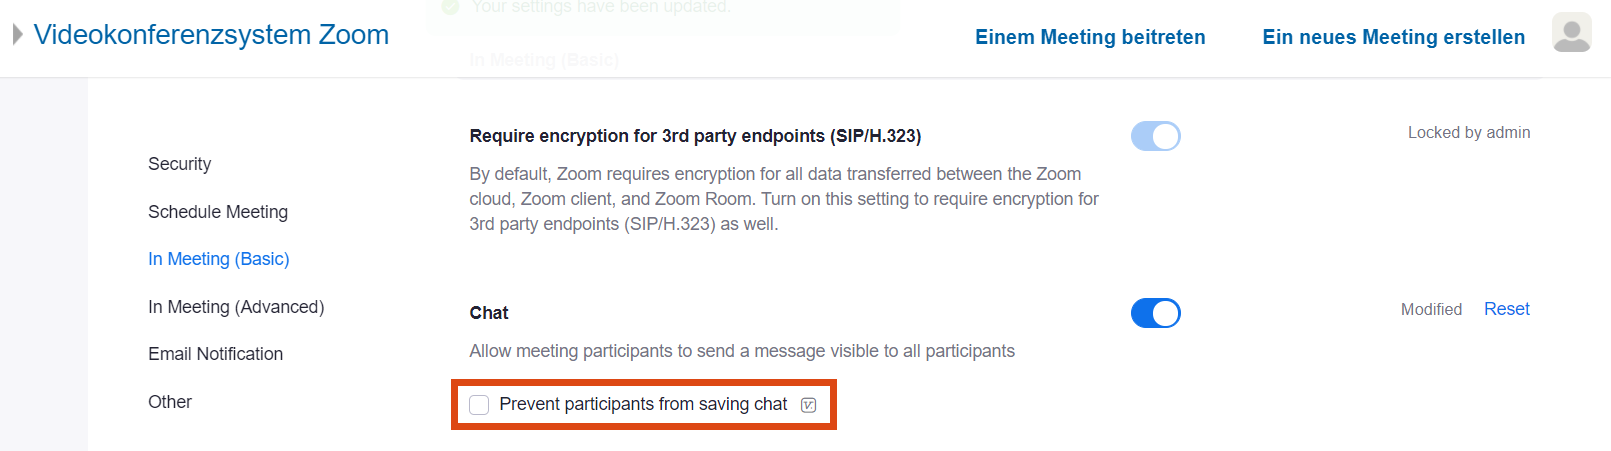
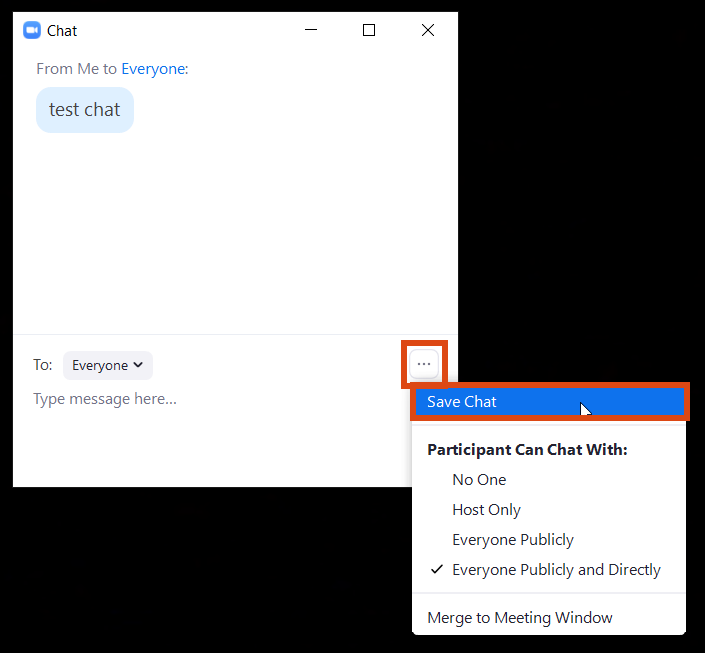
Saving the chat
You can save in-meeting chats locally to your computer.
The prerequisite is that, in the settings under In Meeting (Basics), you disable the option Prevent participants from saving chat. After changing this setting, not only the host but all participants can download the chat.
Click Chat in the meeting controls at the bottom of the Zoom window.

Click the ellipsis icon (...) at the bottom right of the chat window. Click Save Chat to save the chat locally to your device. The default chat save location is your Documents folder / Zoom / Folder with meeting name, date and time.
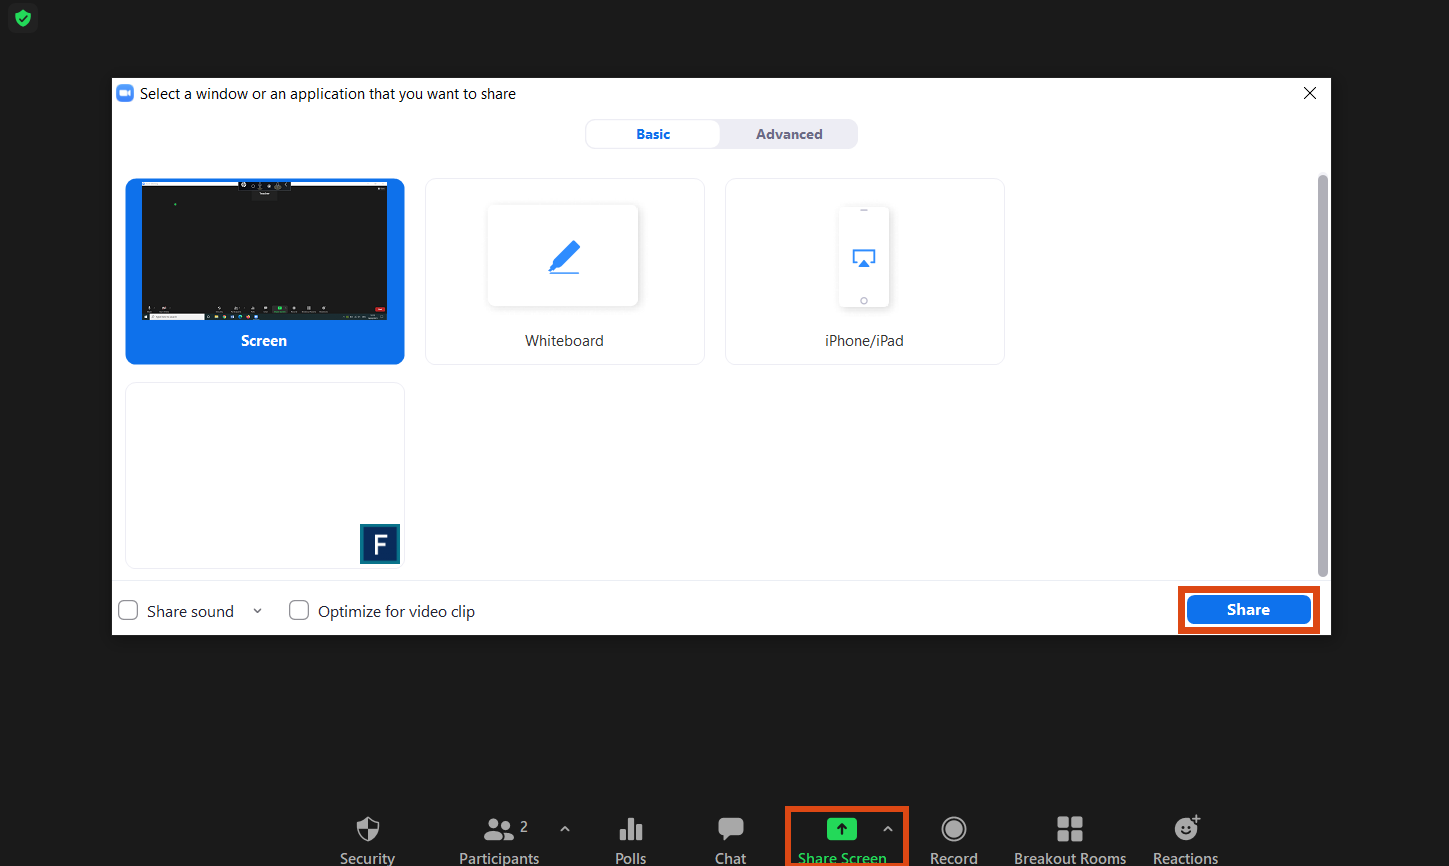
Sharing the screen
While in a meeting, you can share the following content: the entire desktop, your presentation slides, a file or an application.
- Click Share Screen in the meeting controls at the bottom of the Zoom window.
- In the appearing window, select the relevant screen share option.
- Click Share.
Click Stop Share to stop screen sharing.
Click Pause Share to interrupt screen sharing. When pausing screen sharing, the participants see the last screen shared. If you resume screen sharing, the participants see the current screen again.

Note
- By clicking the Security icon in the meeting controls, you can specify if participants can share their screen. Only the host of the meeting can allow participants to share their screen.
- By clicking the ^ arrow icon next to the Share Screen button, you can specify if only one participant or several participants can share their screens at once. There, you can also find advanced sharing options.
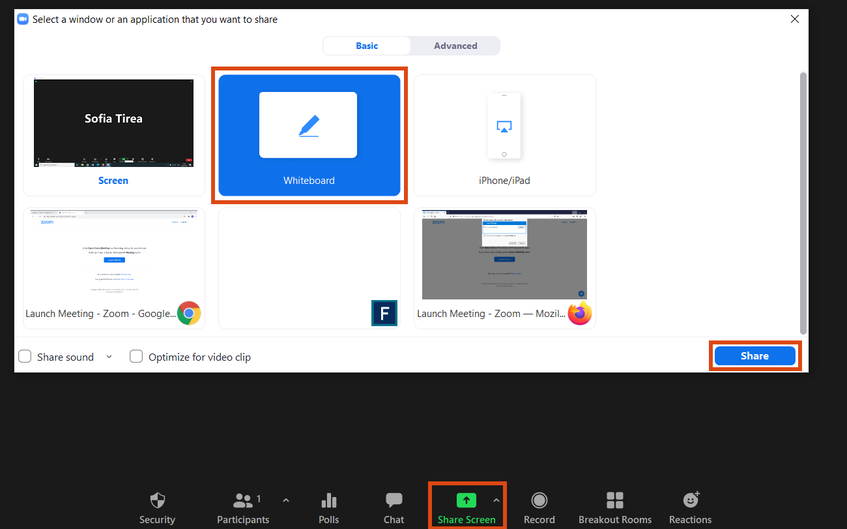
Using the whiteboard
- Click Share Screen in the meeting controls at the bottom of your Zoom window.
- In the appearing window, select the Whiteboard option.
- Click Share to display the whiteboard to all participants.
Using reactions
Click Reactions in the meeting controls at the bottom of the Zoom window to interact with emojis and icons during the meeting.

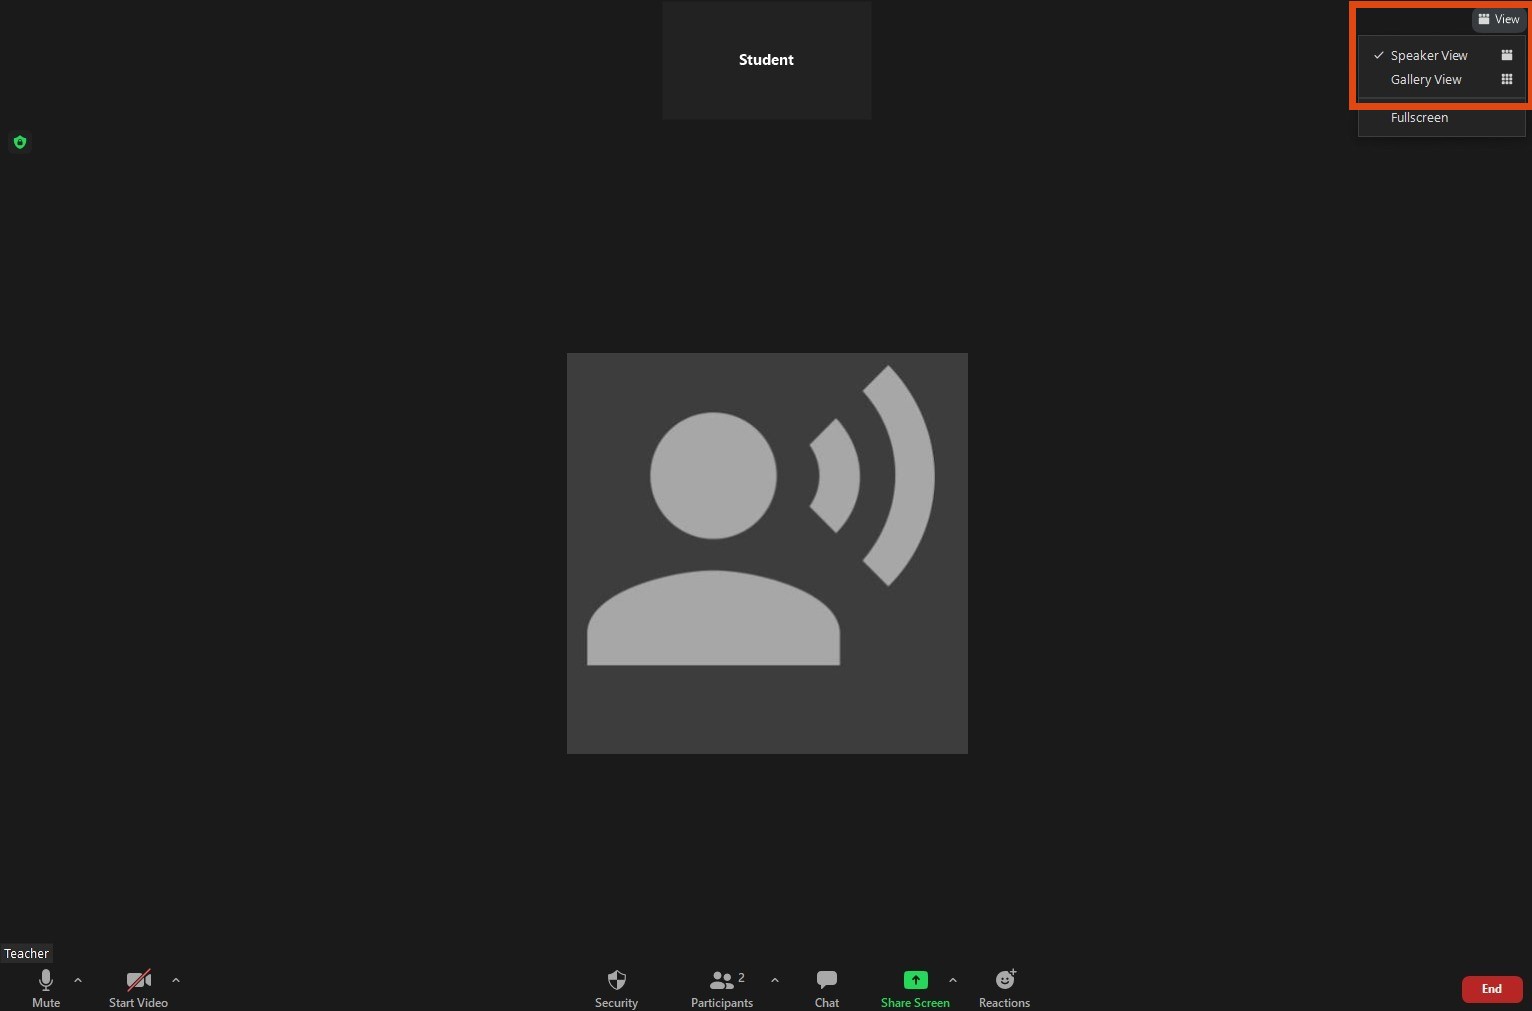
Changing the video view
This function is only available in the locally installed Zoom software.
Click View in the top-right corner of the Zoom window. You can choose between two video layouts:
- Speaker View: The person speaking is displayed in the large video window.
- Gallery View: You can see thumbnail displays of all participants.
Using a virtual background
This function is only available in the locally installed Zoom software.
Further information about using a virtual background can be found in the Zoom Help Center.
Managing breakout rooms
This function is not available in the default and recommended encryption setting. If you would like to use breakout rooms, you have to manually select the enhanced encryption.
The number of breakout rooms that you can create in a meeting depends on the number of participants:
| Participants | Maximum number of breakout rooms |
| Up to 200 | 50 |
| 201–300 | 40 |
| 301–400* | 30 |
| 401–500* | 20 |
* An additional licence is needed for large meetings
Further information about managing breakout rooms can be found in the Zoom Help Center.
Using language interpretation
Further information about language interpretation in meetings can be found in the Zoom Help Center.