Editing u:stream video in Moodle
With the menu item u:stream videos in Moodle, teachers can upload, edit or manage u:stream videos in Moodle. The prerequisite is that at least one u:stream series is linked to the Moodle course.
Other features that can be accessed via u:stream videos in Moodle: link u:stream series to a Moodle course; record videos in the browser with u:stream-Studio.
Note
If you only want to publish individual videos or u:stream series in Moodle, but do not want to edit them further, it is not necessary to use the u:stream videos menu item. Alternatively, use the Moodle activity u:stream, publish the link to the recording or embed the video or series in a TYPO3 website. For none of these methods do you need to create a link between the Moodle course and a u:stream series. For more information, see Publishing recordings in Moodle.
Uploading video
Go to the Moodle course linked to the u:stream series. Click on More and then on u:stream videos in the upper navigation.
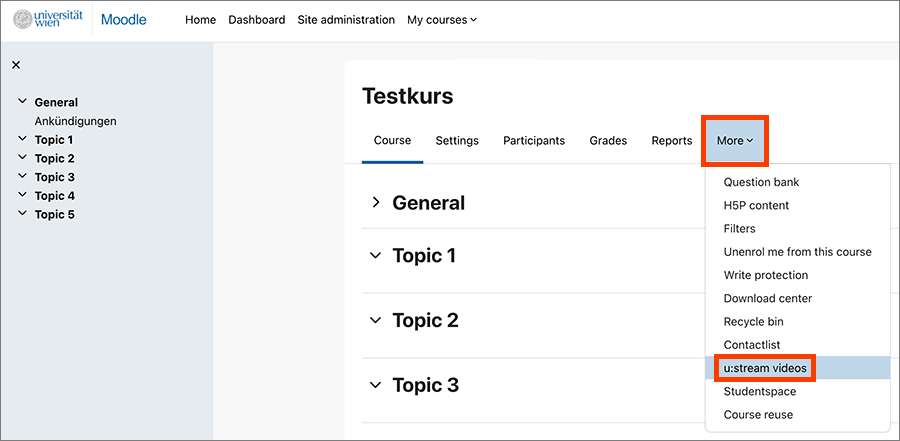
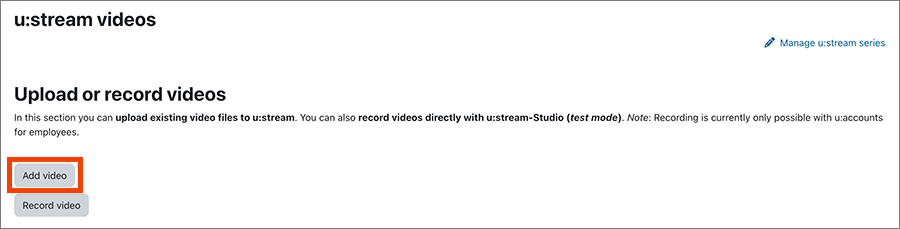
On the u:stream videos overview page click the button Add video.
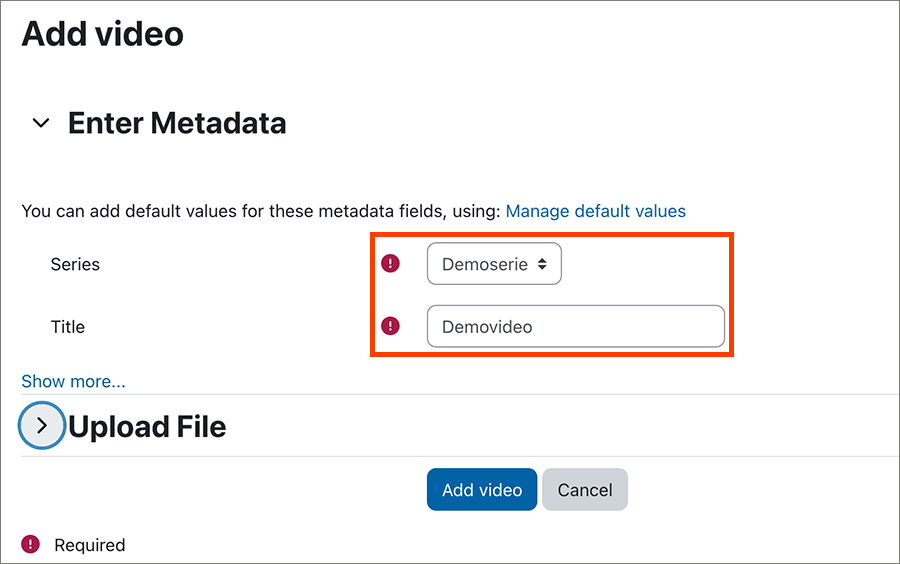
On the following page, under Enter metadata, select which series the video should be assigned to. You can choose from those series that have been linked to the respective Moodle course. You also need to enter a title for the video.
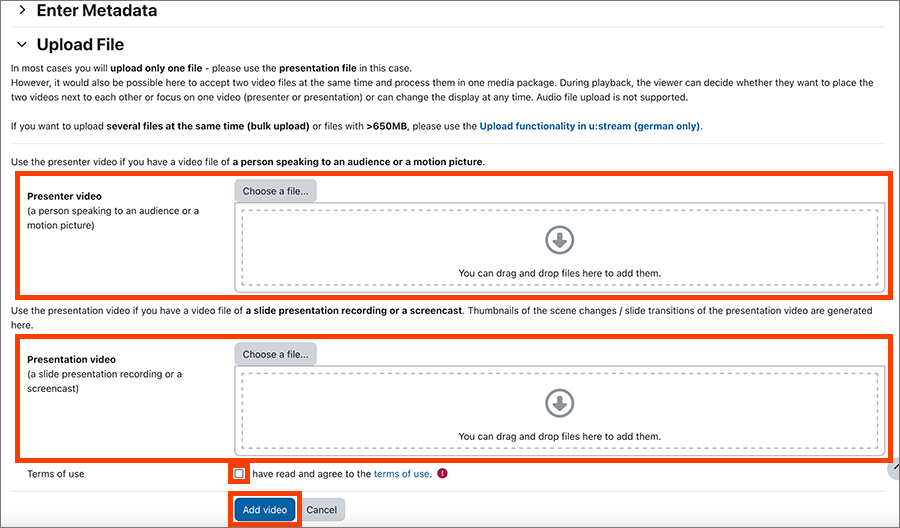
Under Upload File you now have the option to upload a presenter video and/or a presentation video.
- Use the upload for the presenter video if you want to upload a video file with a recording of a speaker. Films and similar videos can also be uploaded here.
- Use the upload for the presentation video if you want to upload the recording of a slide presentation or a screencast.
- If you have a combined recording of slides and presenter (e.g. split screen or picture-in-picture), the ZID recommends uploading as presentation video, as only there is slide recognition and automatic marking of the slide transitions.
- If you have recorded the presentation and the presenter separately in 2 videos (dual recording), you can upload both files at the same time. In this case, when playing the processed videos, the viewers can decide themselves at any time how to display the two videos (side by side, focus on presenter or on presentation).
Note
Uploading audio files from Moodle is not supported. If you want to upload audio files, please use the upload function of u:stream as described in the user guides for uploading videos.
To upload the video, drag the file into the designated area or click on Choose a file ... to select it on your device and accept it with Upload this file. You must then tick the terms of use.
Click on the Upload video button to start the transfer of the file to u:stream.
In the section Videos scheduled to be transferred to u:stream you can see the videos uploaded in the course that are currently in the queue. The transfer happens automatically in the background. You can close this page even if the transfer is not yet complete.

Editing videos in Moodle
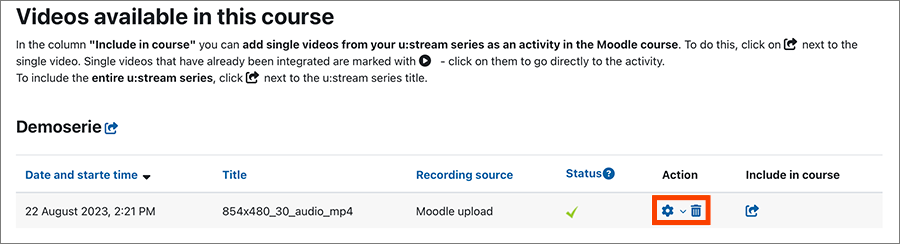
Successfully uploaded videos are listed in the table under Videos available in this course and marked with a green tick under Status. You can edit (gear icon) or delete (recycle bin icon) these videos.
Editing video and metadata in the editor
To edit a video in the editor, click on the cogwheel symbol next to the video and select Edit video and metadata. The editor with the video to be edited opens. You can now choose from the following options in the left side menu: Trim, Metadata and Subtitle.
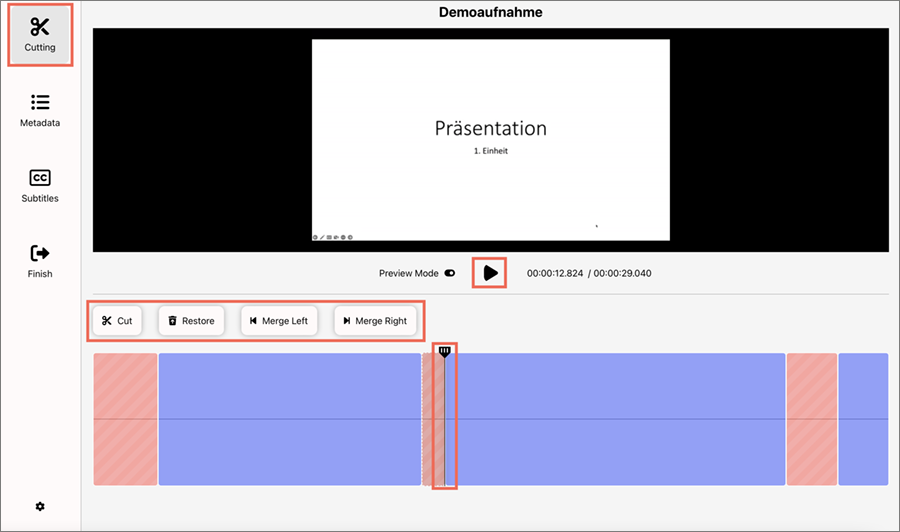
Trim
Here you can cut away the beginning, the end or a part in the middle of the recording.
Use the play button below the video to play the video and pause it at the appropriate point. The vertical marker in the audio track of the video (purple area) shows you where you are in the video. You can also move the marker directly to the appropriate position.
- If you want to remove the beginning or the end, place the marker at the desired point in the video before or after which you want to cut. Click Cut at the desired cut point. Then place the marker on the section to be deleted and click Delete.
- If you want to cut within the video, you need 2 cut points that delimit the section to be cut out. You also set these two cut points with Cut. Then select the section and click on Delete.
You can then watch the video with preview mode on and decide whether you want to save the change. If necessary, you can undo any cuts or deletions made with Merge Left or Merge Right or Restore.
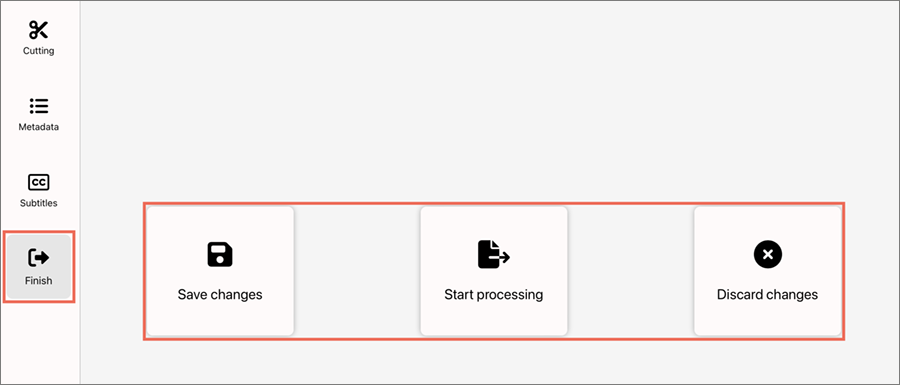
You can now make further changes or click on Finish in the left menu of the editor. Then you can:
- Save changes: The edits made are saved, but the video is not reprocessed. This function is recommended, for example, to save the intermediate status of an edit that should not yet be visible to the users of the video.
- Start processing: The processing of the video is triggered, with which the cuts are transferred to the published video.
- Discard changes: All edits are discarded and the video is not reprocessed.
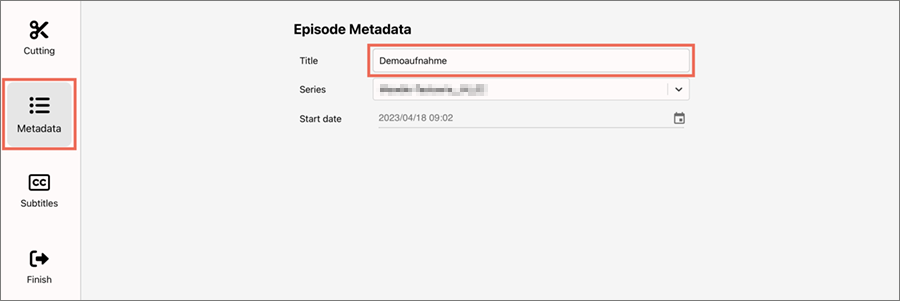
Metadata
Under this item you can change the title of the recording. To do this, overwrite the old title and then click on Finish in the left menu and then on Save Change.
If only the title was changed, it is not necessary to start the processing again. It is sufficient to save the changes.
Subtitles
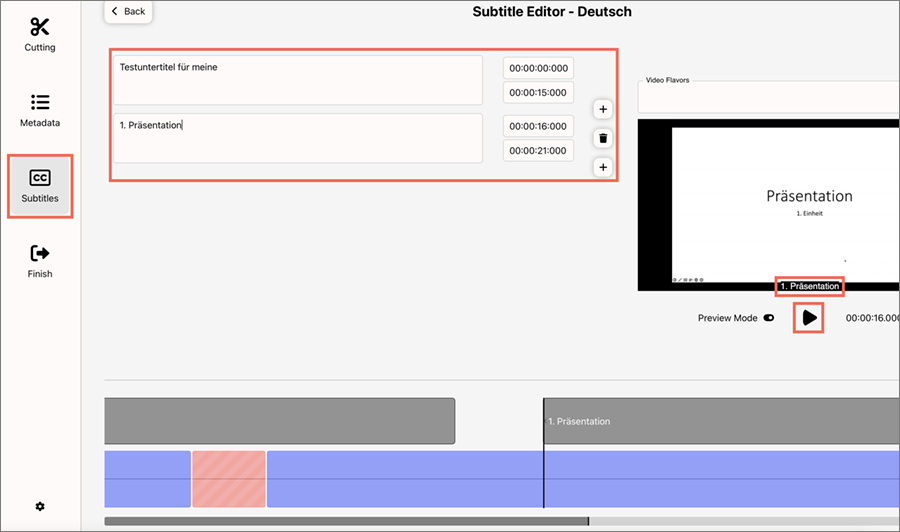
To manually create subtitles for a video, click on Subtitles and then select the language in which you will write the subtitles.
The first content segment is created automatically, you can add as many more segments as you like. You can change the length of the segments using the start and end timecodes next to each segment. In each segment, you enter the subtitles that are to be displayed at this point in the video. If you want to delete a segment, you can do this via Delete segment.
To check the typed subtitles, you can play the video including the newly created subtitles in the preview.
To add the subtitles permanently to your recording, first click Finish in the left side menu and then click Save changes. Then open the Finish menu item again and click Start processing. Select the workflow for publishing subtitles. Be sure to keep to this order, otherwise the new subtitles will be irretrievably lost.
Deleting a video
To delete a video, click on the recycle bin icon next to the video. You will be informed that the file cannot be restored. If you actually want to delete, click on Delete video permanently.
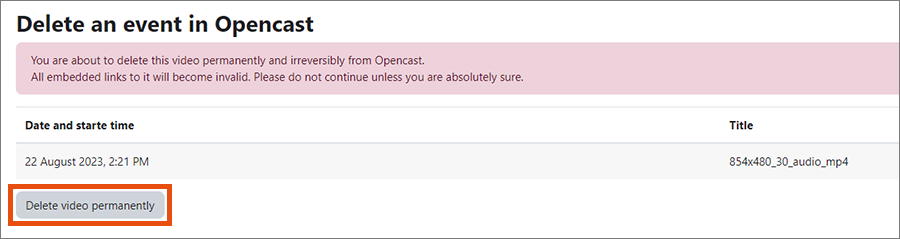
Deleting not only removes the link in the Moodle course, but permanently and irrevocably deletes the video from u:stream. All publications of the video will be invalidated by the deletion. Therefore, remember to also remove any published links and/or activities to the video.
Note
Only use this function if the video is actually to be deleted and the creator of the video - if it is not you - also wants this. This is especially important for courses with several teachers and assistants. And bear in mind that a video can also be published in several courses (e.g. in previous semesters).
Making videos available to students in Moodle
Both individual videos and entire u:stream series can be directly integrated into a Moodle course as an activity via u:stream videos and thus made available to students.
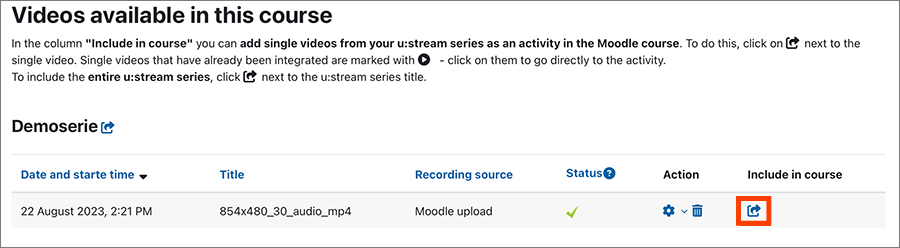
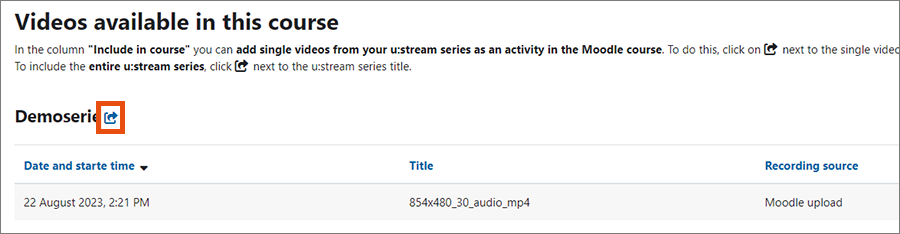
In the section Videos available in this course, all u:stream series linked to the course and the associated individual videos are displayed.
To embed a single video, click on the arrow symbol next to the respective video in the column Include in course.
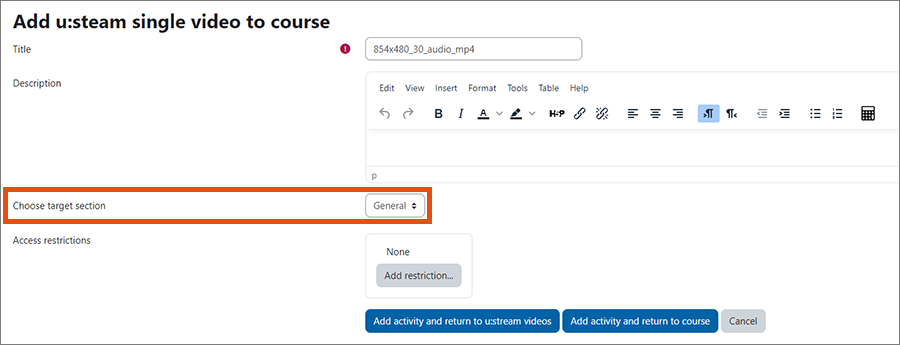
A form opens in which you can enter the desired information such as title, description or prerequisites for the activity. Under Choose target section you specify in which section of the Moodle course the video should be included.
Individual videos already embedded in the Moodle course are marked with the display icon in the overview of u:stream videos. Click on it to go directly to the activity and play the video.

You can also include a complete u:stream series in the course. This will offer all videos that are currently in this series and will be added in the future to students in the form of a playlist.
To embed the series, use the arrow icon right next to the series title.
Here you can also enter title, description and target section of the activity.