Understanding the user interface
This user guide will help you to understand the user interface and structure of TYPO3.
Structure
As soon as you have successfully logged in, you will see the TYPO3 front page. This is structured as follows:
- Bar on top: Clicking on your name will take you to the User settings and the Logout button.
- Module menu on the left-hand side: Here you will find the tools for editing your website.
- Page tree in the centre column: By unfolding, you can navigate specifically to the individual sub-pages of your website and edit them.
- Working area on the right-hand side: Here you will find explanations about the available modules when you first log in. This is the area where you will see and edit the selected contents.

Module menu
You can see the module menu on the left-hand side of the user interface. Depending on your authorisations, it usually consists of the following 3 areas:
- Web
- File
- Uni Vienna Tools
You can collapse and unfold these areas by clicking on their title. The module currently selected appears in darker grey.
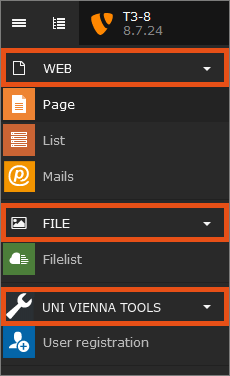
Module area Web
Here you can find the most important modules that allow you to determine the contents, but also the design of your websites. It allows you to create pages, add and edit content elements, and get a preview of the pages before enabling them.
The standard modules in this area are:
- Page: edit visible contents
- List: perform structural tasks, edit data sets of extensions
Module area File
When you click on the module File, you will see the file directory (instead of the page tree). In this you can store files (e.g. pictures, PDF).
For every website, a directory is created at the beginning. You can then create further subdirectories.
Module area Uni Vienna Tools
The module User registration allows you to manage users, i.e. grant other users the right to edit the website.
Page tree
The page tree is available for all modules of the area Web. It opens as soon as you click on one of the modules. The page tree displays all pages of the website that you can access with your level of authorisation.
The page tree shows all websites, that is, a list of website titles on the right-hand side of an arrow. By clicking on the arrow, it turns downwards, and the index unfolds and lists all associated subpages.
For every new website that the TYPO3 team has created, the list only contains the home page and the following folders by default:
- Quicklinks
- Social Media
- Template-Seiten
The page tree does not only list all pages that you can see when visiting the website. Rather, it also includes:
- References: That is, “pages” that refer you to other websites.
- Folders: That can contain pages, references or other folders.
Working area
The working area displays the contents of the page selected in the page tree. The interface may change, depending on the kind of content you are currently working on.
At the top of the working area, you can see different icons for editing the document you are currently working on – depending on the module you selected.
In the module List, these are:
- Create new data set: create new page or new content element
- View webpage: preview the page in another browser window
- Edit page properties: edit page settings
- Toggle search toolbar: search the page
The module Page has the same buttons and additionally two buttons with arrows to hide and show the grid elements of a page.

Customising the user interface
You can customise the user interface to suit your needs. To do so, click on your name in the bar at the top and then on User settings.
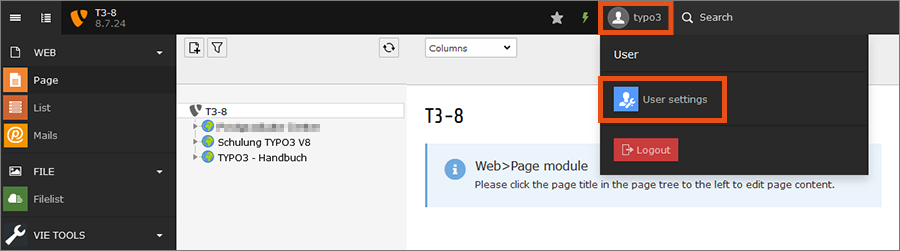
- In the tab Personal data, you can set the language of the TYPO3 user interface.
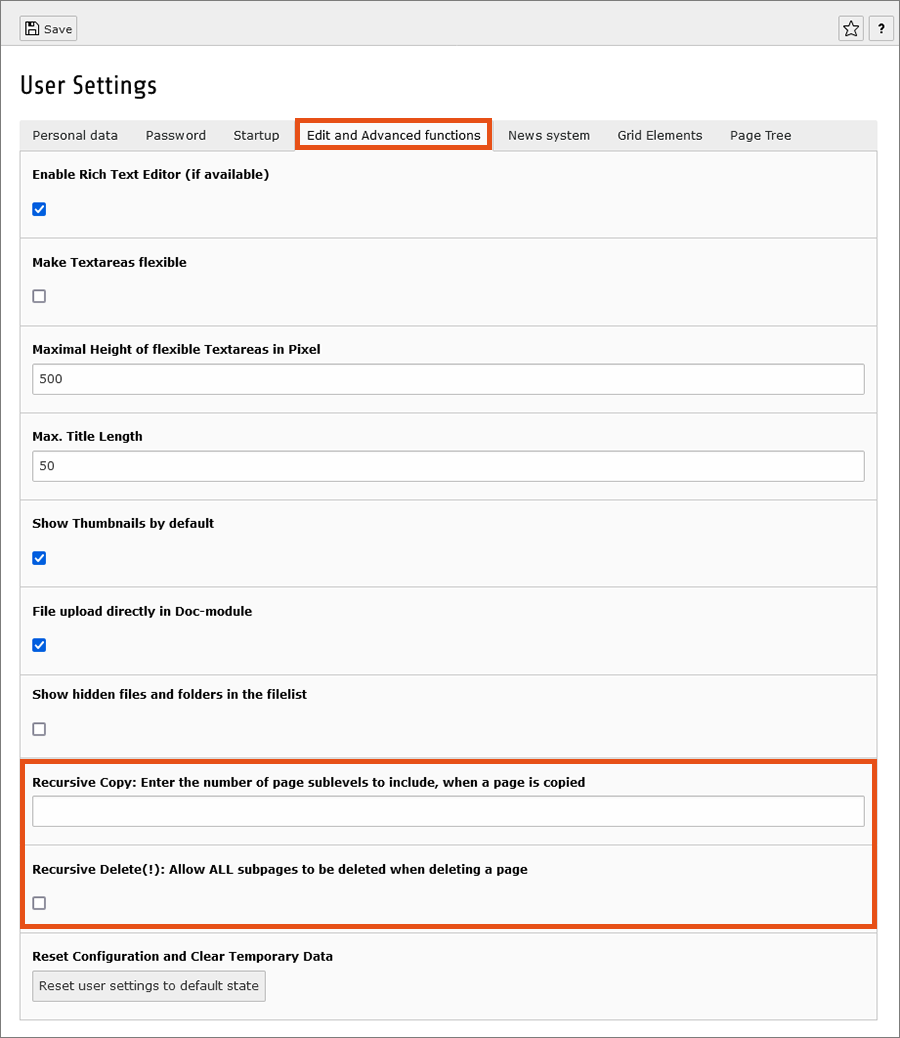
- In the tab Edit and Advanced Functions you can, among other things, activate the recursive copy and recursive delete functions. This makes it possible to copy or delete not only individual pages, but also their sub-pages. To do this, enter a correspondingly high number in the Recursive Copy field and activate the Recursive Delete(!) checkbox.
Click on Save once you have made all the settings.
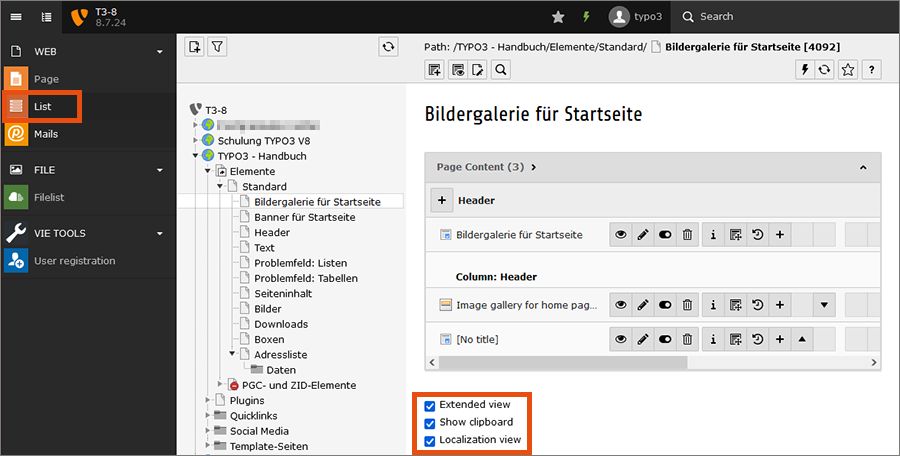
Further setting options can be found in the module List at the very bottom of the working window:
- Extended view: show additional buttons (e.g. Re-position content element, Display change history) for the individual content elements in the module List
- Show clipboard: show elements of the clipboard at the end of the working window in the module List
- Localization view: display content elements for the different language versions of the website next to or below each other in the working window
Note
The activated Localization view can help you not to forget changes in the other language versions of the website.
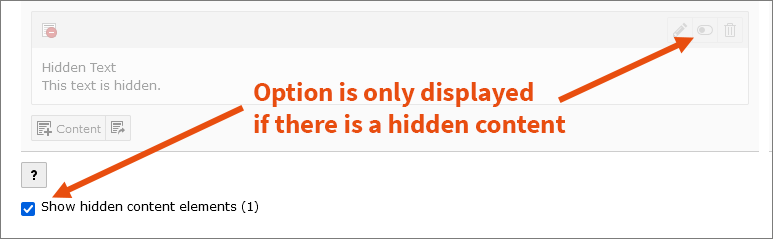
Similarly, in the module Page you have the option of displaying the hidden content elements. The option is only offered on those pages that actually have hidden content. However, the setting applies to all pages.
You only have to make these settings once, TYPO3 remembers them until the next time you call up the backend.