Uploading and editing u:stream video in Moodle
This user guide helps teachers upload, edit and manage u:stream videos via the u:stream videos menu item in Moodle.
Additional functions available via u:stream videos: linking u:stream series in Moodle course; recording videos in the browser with u:stream studio
Note
If you only want to publish individual videos or u:stream series in Moodle, but do not want to edit them further, it is not necessary to use the u:stream videos menu item. Alternatively, use the Moodle activity u:stream or publish the link to the recording.
For none of these methods do you need to create a link between the Moodle course and a u:stream series. More information: Publishing recordings in Moodle. However, it is then not possible to restrict access to members of the Moodle course.
4. Selecting video file
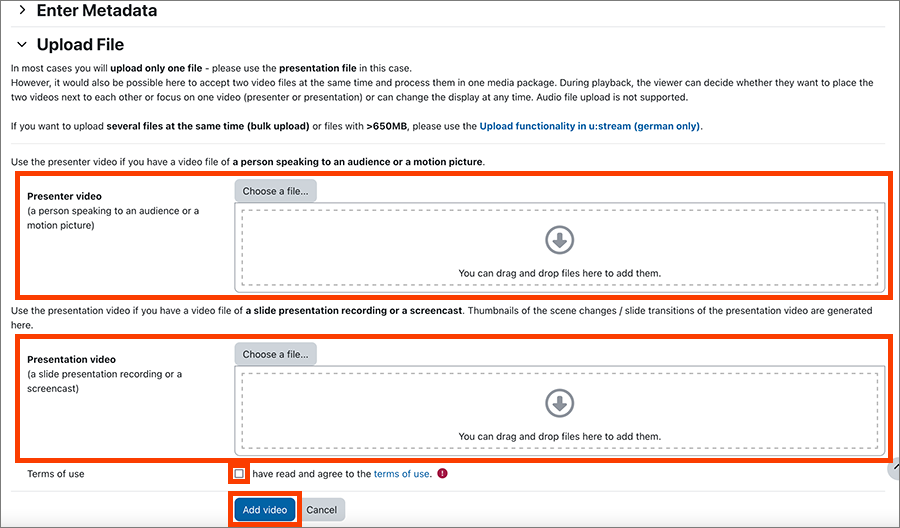
Open the section Upload File. Here you have the option to upload a presenter video and/or a presentation video.
- Presenter video: Use this upload if you want to upload a video file with a recording of a speaker. Films and similar videos have to be uploaded here.
- Presentation video: Use this upload if you want to upload the recording of a slide presentation or a screencast.
- If you have a combined recording of slides and presenter (e.g. split screen or picture-in-picture), the ZID recommends uploading as presentation video. Only there will slide recognition and automatic marking of slide transitions take place.
- If you have recorded the presentation and the presenter separately in 2 videos (dual recording), you can upload both files at the same time. In this case, when playing the processed videos, the viewers can decide themselves at any time how to display the two videos (side by side, focus on presenter or on presentation).
Note
Uploading audio files from Moodle is not supported. If you want to to do this, use the upload function of u:stream as described in the user guide Uploading video or audio file.
Editing video in the editor
You can edit a video in the editor, create subtitles for it, and customise the video’s thumbnail:
- Click the three vertical dots ⁝ next to the video.
- Select Edit video and metadata.
- The editor with the video to be edited will open.
- Select the desired function from the menu on the left.
For a detailed user guide on using the editor, see Editing video in the editor.
Deleting a video
- Click the recycle bin icon next to the video.
- You will be informed that the file cannot be restored.
- If you actually want to delete, click Delete video permanently.
Deleting the video will not only remove the link in the Moodle course, but will also permanently and irrevocably delete the video from u:stream. All publications of the video will become invalid as a result of the deletion.
Therefore, remember to also remove any published links and/or activities to the video.
Notes
- Only use this function if the video is actually to be deleted and the creator of the video – if it is not you – also wants this. This is especially important for courses with several teachers and assistants.
- Bear in mind that a video can also be published in several courses (e.g. in previous semesters).
Making videos available to students in Moodle
Both individual videos and entire u:stream series can be directly integrated into a Moodle course as an activity via u:stream videos and thus made available to students.
In the section Videos available in this course, all u:stream series linked to the course and the associated individual videos are displayed.
Embedding single video
To embed a single video, click the arrow symbol next to the respective video in the column Include in course.

- A form opens in which you can enter title, description or prerequisites for the activity.
- Under Choose target section you specify in which section of the Moodle course the video should be included.
Individual videos already embedded in the Moodle course are marked with the display icon in the overview of u:stream videos. Click on it to go directly to the activity and play the video.


